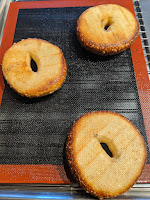
Asking myself how I wished I could make bagels, I had this answer: having pre-shaped bagels in the fridge already, I'd like to pull them out of the fridge, dunk them into a room-temperature bath, and put them straight into an oven. Tell the oven to proof, then steam, then bake, and go get them out when they're done. Well, guess what? It worked, and here they are!
INGREDIENTS
Dough
|
552 g |
(2.33 cup) |
water |
|
1 Tbsp |
|
salt |
|
21 g |
(2.33 Tbsp) |
wheat gluten |
|
905 g |
(2 lb) |
bread flour |
|
1.5 tsp |
|
yeast, instant/bread |
|
16 g |
(2 Tbsp) |
malt, non-diastatic |
|
2 tsp |
|
malt, diastatic |
Dunking Bath
|
237 g |
(1 cup) |
water |
|
1 pinch |
|
salt |
|
0.25 tsp |
|
baking soda |
|
8 g |
(1 Tbsp) |
malt, non-diastatic |
Equipment
2 half-sheet pans with lids
Mesh-style “Silpat”
Combi (steam) oven
Directions
A day or two before:
- Make dough; The dough should be stiff rather than wet, pulling away from the bowl rather than pooling, although still smooth:
- Measure water and salt into the mixer. Mix gluten with about ⅓ of the flour, and add to the mixer, and start it on low speed. Let it keep running.
- Reserve about 1.5 cups of the flour. Mix the yeast and malt powders into the remainder of the flour, and add to the mixer while still on low speed. Depending on your mixer, switch to dough hooks when the dough is thick enough for the hooks to work.
- Gradually add the reserved flour. Increase the speed to medium and allow to knead for 7 min, checking occasionally.
- Remove beaters, covered mixer bowl, and proof at room
temperature for 1 hour.
- Line 2 half-sheet pans with a sheet of parchment.
- Using very little flour, cut and roll dough into 12 equal tight balls. Poke a finger through the ball, and roll it out to make the hole oversized; the hole will shrink by the time it's a bagel.
- Lay six bagels on each lined baking sheet, pop on a
cover, and refrigerate overnight or for up to 2 days.
On baking day
- Mix up the dunking bath in a bowl slightly larger than
one bagel.
- Dunk up to six bagels in the bath, one at a time, and
lay on a mesh-style Silpat. Place on the next-to-bottom oven rack.
- Run a 3-stage oven routine*:
|
Stage |
1 |
2 |
3 |
|
proof |
steam |
bake |
|
|
Transition |
automatic |
automatic |
|
|
Sous Vide |
on |
on |
off |
|
Temperature |
90° |
212° |
450° |
|
% |
100 |
100 |
75 |
|
element |
rear |
rear |
rear |
|
fan |
high |
high |
high |
|
time |
20 |
8 |
15 |
|
starts |
immediately |
immediately |
immediately |
https://www.epicurious.com/recipes/food/views/bagels-366757
https://www.youtube.com/watch?v=rdeQT7KkqM8
http://www.homemadebagels.com/2009/10/how-to-make-bagels.html#.WryEj4jwb-w
http://www.thefreshloaf.com/recipes/bagels#comment-29114
http://www.thefreshloaf.com/recipes/bagels
http://www.thefreshloaf.com/recipes/bagels#comment-29114
http://www.thefreshloaf.com/recipes/bagels#comment-134395
http://www.thefreshloaf.com/recipes/bagels#comment-155801
http://www.homemadebagels.com/2009/10/how-to-make-bagels.html
http://www.kingarthurflour.com/recipes/bagels-recipe
http://www.kingarthurflour.com/recipes/a-dozen-simple-bagels-recipe
http://www.kingarthurflour.com/recipes/water-bagels-recipe


Hey, thanks for posting! Found you through the reddit steam oven sub. I just tried this out but forgot to take a picture, darn. They came out pretty good, but I think I'm going to tweak a bit. (Using my usual dough recipe, just stealing your process. I do a 1hr bulk proof and then shape them and fridge them overnight to rest/develop. Then I usually boil/bake in the AM.)
ReplyDeleteI'm going to try:
- Up the baking soda, drop the malt a bit in the dunk bath. I feel like they browned a bit fast, and didn't quite get a fully developed chew-crust.
- Lengthen the steam time, probably preheat + 4 mins. My oven barely got up to 212f in the 8min window.
- Definitely get a mesh silpat or do them on a rack next time, our standard silpat made for soggy bottoms.
I'll try to report back!
Fantastic! A fellow reddit baker has posted some lovely photos and comments on how they're trying to get a darker bagel bottom. Mine came out in-between; not soggy, very lightly tan on the bottom, but not nice and brown. Sounds like moving the mesh silpat onto a hot pan for final bake did a nice job.
DeleteI added a couple of "bagel bottom" photos. I'd love to try your recipe, if you don't mind sharing; especially if they come out better than mine. :)
Delete